Sunday, October 11, 2020

Lack of Information in Error Log File UCI Form

Many times, it happens that we get an error or exception message while working on the Dynamics 365 UCI form.

So, to get more information related to the error we download the Log File.

Now at this point of time we struggle to find the information related to error while working on the UCI form.

Below is the comparison between an exception error that will come between UCI form and Classic form.

The reason why I am showing this comparison is because when we download the error Log File on both of the form, we don't find plenty of information in the Log File downloaded on the UCI form.

But in the Classic form we find enough information.

Below is the comparison of generated Log file between UCI form and Classic form.

Above screenshot contains the error related to the external assembly registered i.e. “Newtonsoft.Json”.

Note:  Due to the SANDBOX isolation mode in all MS CRM online versions, registering an external assembly require Merging. Refer: Merger External Assemblies.

Solution

An alternate solution is to enable Trace log and read the error from Plug-in Trace log.

1. Go to Setting -> Administration->System Settings.

2. Go to Customazation and select Exception.

After doing this, whenever we get any Exception, we can go to Plug-in Trace Log and see the error record.

3. Go to Settings -> Plug-in Trace Log.
4. Open the record.

Below is the last Exception Record that was created when we get an Exception error on my screen.

After opening above record we get enough detail as we were getting in Classic forms.


Happy Learning, LET'S SHARE !

Thursday, October 8, 2020

Get N: N relationship records in Canvas App using CDS/Dataverse – Power Platform

Note- We have to use Dataverse connector instead of CDS now, steps would be same.

Scenario
–

Let us assume there are two entities with N: N Relationship and we need to show the related records on Canvas App.

Lets get started.

1.  Entity Design

Entity 1 – First (Project records are stored in this entity)

Entity 2 – Second (Resource records are stored in this entity)

Relationship – N:N

We associate few Resources to Project in CDS as below-


Now we want to visualize this data in canvas app. Let us see further steps.

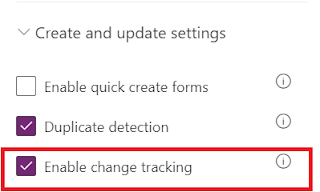
2. Enable Entities for Change Tracking

We need to enable change tracking for both the entities to access N:N data.

First Entity- This store Project Records


Second Entity - This store Resource Records

3.  Create canvas app 

Go to https://make.powerapps.com/, click on “Create”, select Canvas app from blank.


We will see a blank screen to which we will add controls from the ribbon


Our screen is ready.


4. Attach data source to canvas app.

Click on Project dropdown and in the Properties window provide entity and column you want to display in the dropdown.


Click on Resources Datatable and data custom data source from the formula bar –


To add columns to the 
Datatable select the control, go to properties, click “Edit fields” and add required fields.


All done, Let’s run the app.

Output – On selection of Project, only associated records shown in the Datatable.


Happy Learning, LET’S SHARE!

Popular Posts