Showing posts with label Function App. Show all posts

Tuesday, September 15, 2020

Call Azure Function from Dynamics 365 via Power Automate - Part 5.2

Power Automate

Power Automate, earlier known as Microsoft Flow has multiple connectors that perform some Actions on some Events. The combination of connectors used to create Automated Workflows.

Connector is the tool to connect two external Applications together.

Example- When  creating any record in MS Dynamics 365, insert same record into SQL Database.

MS Dynamics 365 and SQL Database are two different Applications.

Event can be Create of Record, Update of Record, Delete of Record and etc.

Action can be Create of Record, Retrieve of Record and etc.

Scenario-

A requirement states that we need to call an external API that return some response.

This API will be triggered on create of a record in Dynamics 365 and returned response will be updated back to that particular record.


Solution-

We can make External Http Request using Power Automate Connectors.

Step 1 – Go the https://flow.microsoft.com/en-us/ , sign-in and select Environment.
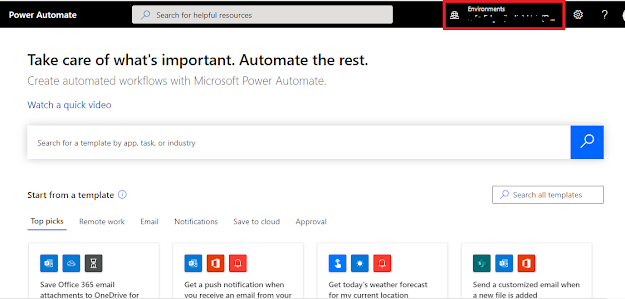
Step 2 – Go to the Solutions, Open the solution and create a new Flow.

After clicking solutions, we will find the same solutions list that we had made in our Dynamics 365 environment. We need to open any solution and create a flow under that solution just like any other component i.e. Entity, Fields, Web resources etc.

Step 3 – Search for Common Data Service Connector.

Note: Do not use Dynamics 365 connectors as they are deprecated now.

Step 4 – Select Trigger condition and Entity name and then click on +New step.
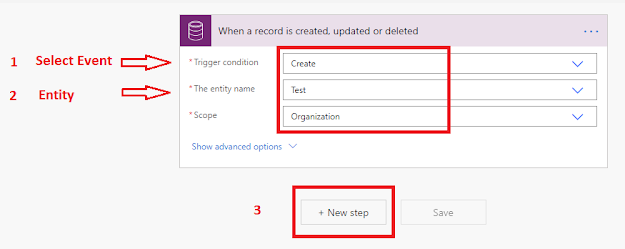

Step 5 – Search for HTTP.
Http is used to call API Endpoint by sending Request.

Step 6 – Follow as per below.

Step 7 – Click on +New Step to add another connector and search for Initialize.

Initialize is the connector used to contain the Response from HTTP connector (which sends HTTP Request and receive Response back).

Step 8 – Follow as per below.

This variable containing Response will be used to update the Dynamics 365 record of Test Entity.

Step 9 - Click on +New Step to add another connector and search for Common Data Service.
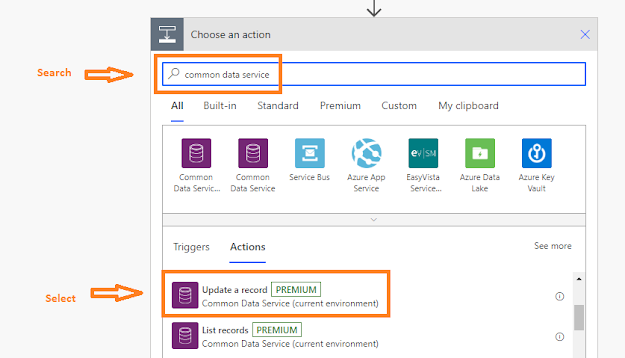
Step 10 – Follow as per below and Click Show advanced options.

The Unique identifier is like GUID.
Example -

Step 11 – Follow as per below and Save the flow.

After saving the flow, it will look like-

Step 12 – Now go to the Test Entity and create a New Record.

Step 13 – Save the form and reload it.
Hurrraayyyyy! We did it :)

We ran our flow successfully. To see the flow run, go the solution where we had made a Flow  and open it.

We will find the history of Flow runs.

After opening the above flow run history, we will find a successful execution of each connector.


Happy Learning, LET'S SHARE !

Call Azure Function from Dynamics 365 via Plugin– Part 5.1

Previous Post - Call Azure Function using Console Application – Part 4

Note - This blog will not focus on plugin creation.

Pre-Requisite -  

i) Create an entity named "Test" with 2 columns as below.
ii) Create and register plugin on entity "create" event  

Plugin triggered on record creation will send the request to the Azure Function and the response will be updated on the source record.


Step 1 – Create a Class Library (.Net Framework) Project from your Visual Studio.

Add a class “StudentDetail” and data member “name”. This data member will contain the request from Target (Test Entity record).

Step 2 – Add a method “CallingAzureFunction” to “DemoClass”

Step 3 – Add below code to the “Execute” method of plugin named “DemoClass”.
    

Step 4 – Register Plugin on "create" event as below
    Step 
Note: As we have used external assembly "Newtonsoft.json", to register plugin assembly in Sandbox Mode will require DLL Merge.
 

Step 5 – After Successful registration of step, go to “Test" entity and create record.

Once record saved, response from Azure Function is updated in the "Response" field.

Lets have a look at Azure Function to understand the response updated in CRM.


Happy Learning, LET'S SHARE !

Friday, September 4, 2020

Call Azure Function using Console Application – Part 4

Previous Post - Calling Azure Function using Postman – Part 3

In this part, we will create a Console Application (.Net Framework) and call Azure Function from it.

Step 1 – Open Visual Studio and create Console Application (.Net Framework) project.


Step 2 – Add a class “StudentDetail”and its data members as below.

We will be using these data members to send request to the Azure Function.


Step 3 – We will "set" static values to data members of the Student Details class. 

Add below code to your “Program” class.


Step 4 – Create "WebClient" to call Azure Function.

We will use “WebClient” method for sending request and receiving response and “Newtonsoft Json” library to convert student object to json string that will be further used as request parameter to Azure Function.

Add below code to your “Program” class.

Step 5 – Debug code line by line and see the request and response.

Request


Response


The reason why we are getting this response is because of below code in our Azure function that we had deployed.


Yay!! We Did it.

Stay Connected, to see next part of the series.

Reference to MS Documentation - 

https://docs.microsoft.com/en-us/azure/azure-functions/

Happy Learning, LET'S SHARE !

Create Azure Function using Azure Portal – Part 1

Previous Post - Introduction to Azure Functions

Step 1 – Login in to the Azure Portal, URL - "https://portal.azure.com/"

Step 2 - Click on "Create Resource".


Step 3 – Click on "Function App".


Step 4 – Fill all the information and click on "Review+Create" button.


Step 5 – Click on the "Create" button.
 

Step 6 – Click on the "Go to resource" button.
 

Step 7 – Click on the "Functions".


Step 8 – Click on the "Add" button and select "HTTP trigger".


Step 9 – Name Azure Function and click "Create Function" button.


Step 10 – Click on the "Refresh" button and go to function by clicking on its name.


Step 11 – Click on the "Code + Test".


Step 12 – Now to test Azure Function, click on the "Test/Run" button.


Step 13 – Click on the "Run" button.


Step 14 – Whooooo!! We did it. 😊


Step 15 – Click on the "Get function URL".


Step 16 – Copy "END POINT URL" for further use.


NOTE- Only .Net Core run time stack can be used while making Azure Function from Azure Portal. 

Lets jump on to Part 2 -  Create Azure Function using Visual Studio.

Reference to MS Documentation - 

https://docs.microsoft.com/en-us/azure/azure-functions/

Happy Learning, LET'S SHARE !

Popular Posts