Monday, February 4, 2019

D365 Error:- Assembly does not allow partially trusted callers.

About this Blog-

This blog highlights the common error which is usually faced by Developers in D365.

Problem Statement - You might have faced error saying "Assembly does not allow partially trusted callers".

Common Scenario- You have registered custom workflow which uses one of the component defined under System.Web namespace and you use that custom workflow in your system workflow.

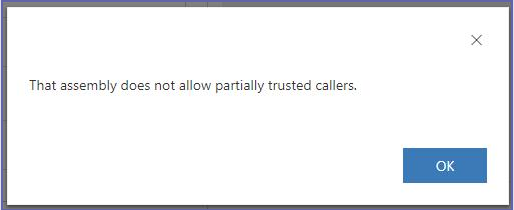
Below mentioned error pops up:-


Solution- If you are referring any assembly registered under System.Web namespace or any other external namespace within sandboxed assembly, you need to replace it with other alternative to make your code work smoothly.


Here HttpUtility.UrlDecode is the source of issue, because your custom assembly registered in sandboxed mode is not allowed to access this. Once you remove this piece of code your code will work like a charm!

Sunday, February 3, 2019

Import D365 Solution

About this Blog –

This blog mainly focus on importing solution in Dynamics 365 Organization.

Step 1- Go to Settings àSolutions


Step 2- Once you click on “Solutions” button, you will be able to see the list of solutions installed in the Organization.


Step 3- Click on “Import” button on the ribbon.


Step 4 – Once you click Import, new window pops-up where you can chose the solution file to be Imported.


Step 5 - Once you have selected the solution to import, then click on Next Button.


Step 6 – Once the wizard is finished, you can see the solution is installed in your Organization and can be seen under solution grid. 


So in this blog, you saw how easy is to import a solution in D365 using these simple 5 steps.

Create D365 Solution


About this Blog –

This blog mainly focus on creating a new solution in Dynamics 365 Organization.

Step 1- Go to Settings àSolutions


Step 2- Once you click on “Solutions” button, you will be able to see the list of solutions installed in the Organization.


Step 3- Click on “New” button on the ribbon, to create a new solution.


Step 4- To create a new solution, you need to provide a few mandatory parameters highlighted below-

  1. Display Name - Name you want to give to your solution.
  2. Name - This will be auto-generated based on your Display Name.
  3. Publisher – You can select the default publisher or create custom publisher and associate with the solution.
  4. Version – You can provide a version to your solution, which can be updated with the incremental version number in the future. [Major.Minor.Build.Revision]


Step 5- Click on the “Save and Close” button to view the newly created Solution.


So in this blog, you saw how easy is to create a solution in D365 using these simple 5 steps.

Popular Posts